SuperDucky is an enhanced version of Hack5 Rubber Ducky BadUSB.
Introduction
The device can be programmed to emulate a USB keyboard (HID Human Interface Device) and inject keystrokes on the target computer based on scripts (payloads) that are either preloaded or sent via WiFi.
Although it is a little wider than most USB drives nowadays, it is fairly easy to disguise it as a flash drive or embed it within many USB-powered devices like power banks, USB mug heaters, USB fans, etc.
The device is able to issue keystrokes at speeds of over 1000 words per minute, making it possible to inject complex payloads within seconds.
Disclaimer
This project was developed exclusively to demonstrate and raise awareness of the security vulnerabilities of many systems. Advice on how to protect your system from devices like this can be found below. If you intend to fabricate this device, please make sure beforehand that is legal to do so in your country and ensure that any tests carried out with it are done on your own devices. The author provides no warranty and takes no responsibility whatsoever over any of the information provided within this article.
Credits
This project aims to combine and extend the best features of Mario Harjac bad_ducky and Stefan Kremser wifi_ducky, which are both based on the very popular Darren Kitchen USB-Rubber-Ducky, Luca Bongiorni WHID Injector and Corey Harding ESPloitV2.
The software makes use of several open source libraries from me-no-dev and NicoHood. If you believe you should be mentioned in this section, please send me a message.
How it works
Practically every computing device accepts human input from keyboards. When connected to a USB port, keyboards announce themselves to computers as Human Interface Devices (HID) and are in turn automatically recognized and trusted, without the need to install any additional software or administrator rights.
As soon as the device is connected to a computer it presents itself as a keyboard and delivers the payload that it was programmed to execute in advance, or waits for instructions to come remotely via WiFi.
Payloads are easily crafted using a simple scripting language (Ducky Script).
Hardware
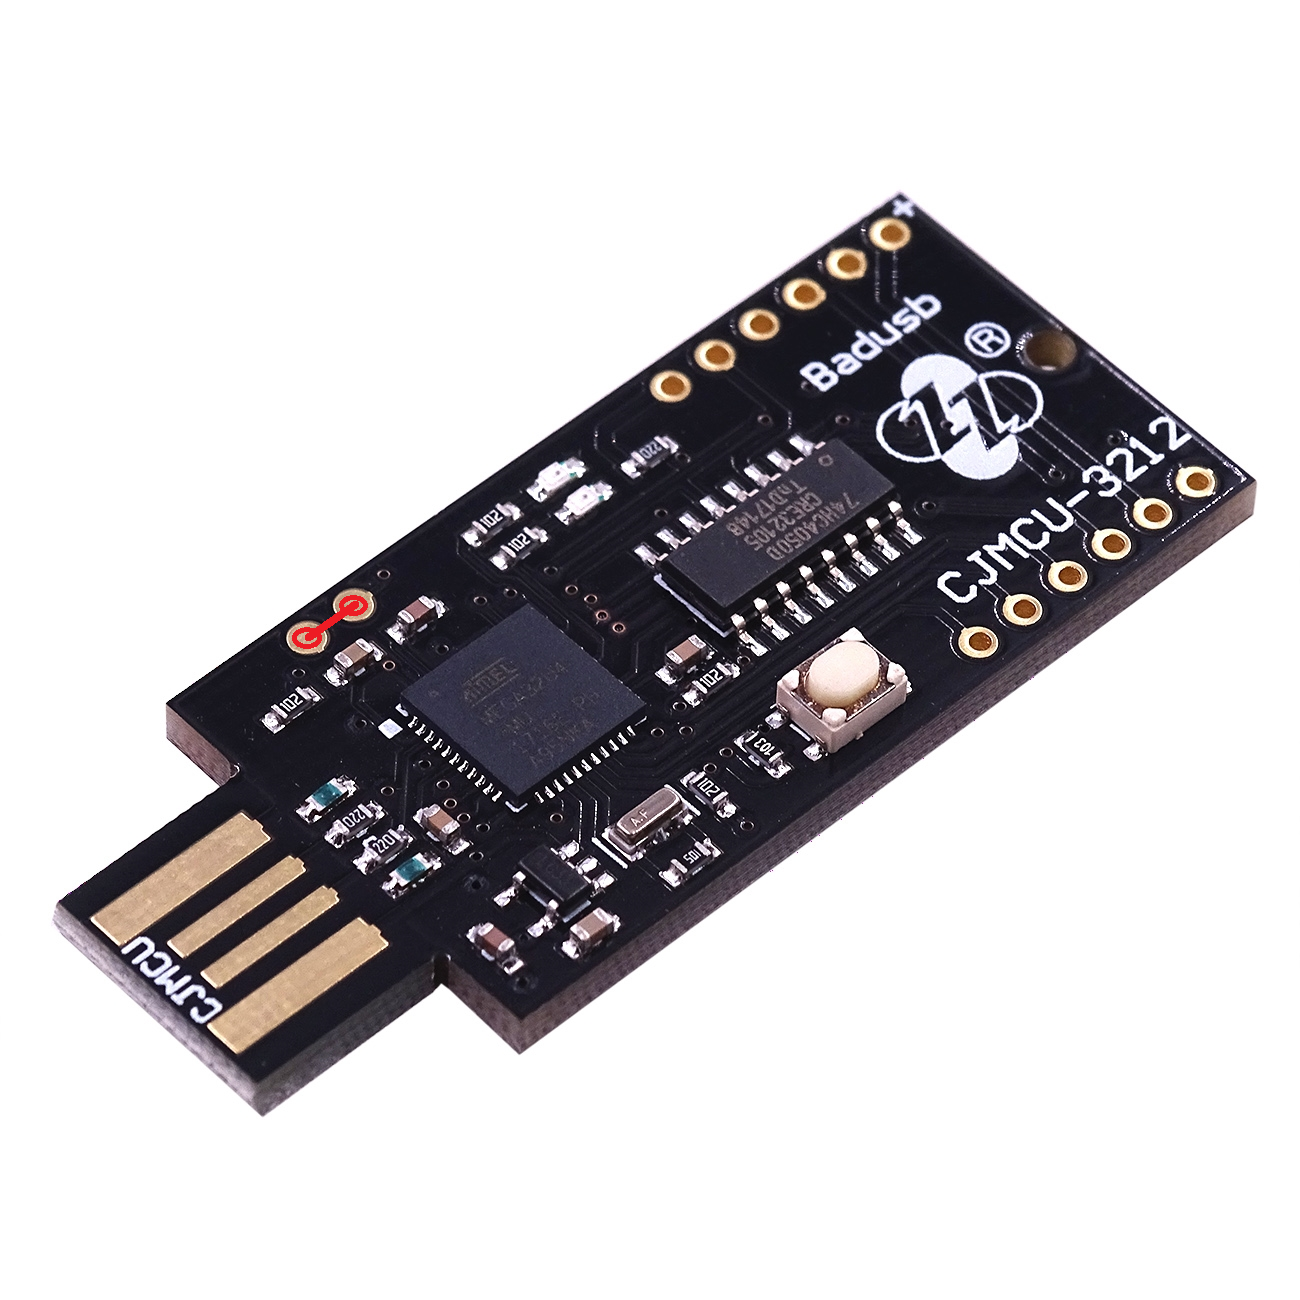
SuperDucky uses CJMCU-3112 BadUSB with WiFi, a modified version of an Arduino Leonardo (ATmega32u4) loaded with the WiFi module AI-Thinker ESP12e (ESP8266) and an onboard SD card reader, which can be purchased from AliExpress for less than 20$.


Software
The device has two micro controllers, the ATmega32u4 (which has access to the USB interface) and the ESP8266, which handles the WiFi interface. Both micro controllers need to be programmed with their specific firmware.
In order to do so we first need to install the following software and libraries:
- Arduino IDE
- ESP8266 Board Library
- File -> Preferences -> Additional Boards Manager URL -> http://arduino.esp8266.com/stable/package_esp8266com_index.json -> Ok
- Tools -> Board -> Boards Manager… -> ESP8266 -> Install
- ESPAsyncWebServer Library - (Download)
- Sketch -> Include Library -> Add .ZIP Library…
- ESPAsyncTCP Library - (Download)
- Sketch -> Include Library -> Add .ZIP Library…
- HID-Project Library - (Download)
- Sketch -> Include Library -> Add .ZIP Library…
Once the Arduino IDE and the required libraries are installed we can proceed to download and extract the firmware to be uploaded to the microcontrollers. There is no need for additional hardware or programmer since both microcontrollers can be programmed connecting the device to the USB port of the computer.
Programming ESP8266
The ESP8266 microcontroller does not have direct access to the USB interface of the device. Until the microcontroller is loaded with a firmware that allows OTA programming, the microcontroller needs to be programmed through the ATmega32u4, which is programmed first with a loader that will forward any bytes received from USB port on to the ESP8266.
Program ATmega32u4 with Loader Firmware. This firmware is required to be able to program the ESP8266 through the USB interface of the device.
- Open Ardunio IDE
- Open
SuperDucky_Loader.inoSketch: File -> Open… - Setup target board: Tools -> Board -> Arduino Leonardo
- Setup COM port: Tools -> Port -> COM X (Arduino Leonardo)
- Compile and upload the firmware: Sketch -> Upload
Program ESP8266. This firmware is responsible for providing WiFi connection and serving the web site to manage the device In order to set the ESP8266 in programming mode, its pin #18
GPIO0needs to be connected to GND during the whole programming operation: This can be achieved by using a jumper wire to connect between these two points:
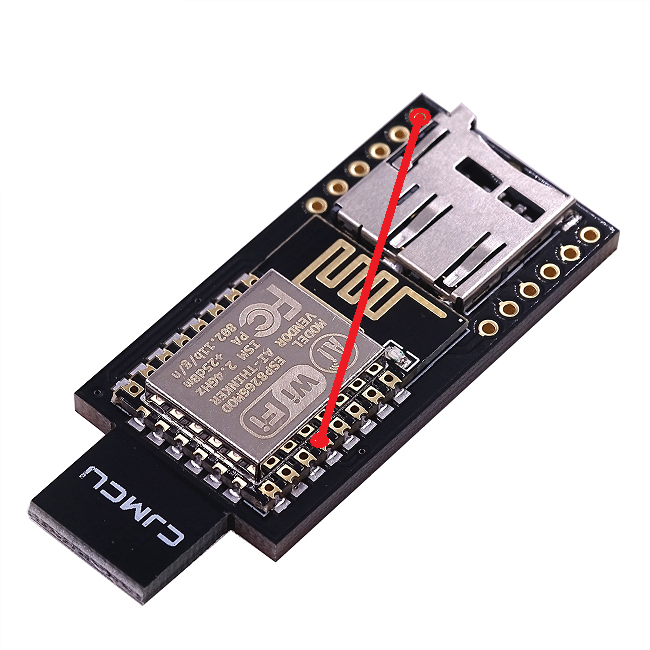
Or by temporarily welding these two pads together:
Once the jumper is installed, insert the device in the USB port and proceed with the following steps:
- Open Ardunio IDE
- Open
SuperDucky_ESP8266.inoSketch: File -> Open… - That will also open
data.h,settings.h&settings.cpp - Change WiFi credentials as needed
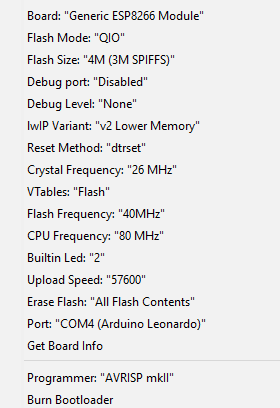
- Setup target board: Tools -> Board -> Generic ESP8266 Module
- Setup COM port: Tools -> Port -> COM X (Arduino Leonardo)
- Setup other programming settings:
- Compile and upload the firmware: Sketch -> Upload
After the firmware is uploaded, remove the jumper (or the welding) to set the ESP8266 micro controller into normal operation mode and reinsert the device in the USB port.
Programming ATmega32u4
Once the ESP8266 is programmed proceed to program the ATmega32u4 with the firmware that will emulate USB devices, read scripts and issue keystrokes.
- Open Ardunio IDE
- Open
SuperDucky_ATmega32u4.inoSketch: File -> Open… - Setup target board: Tools -> Board -> Arduino Leonardo
- Setup COM port: Tools -> Port -> COM X (Arduino Leonardo)
- Compile and upload the firmware: Sketch -> Upload
Loading Scripts and Configuration
Once the programming of the micro controllers is completed, the SD card can be formatted and loaded with the configuration file and a library of scripts. The configuration file settings.cfg sets the mode of operation (continuous delivery, one time delivery & management), the keyboard language (by default English) and the scripts to be executed.
Feature Summary
- Compatible with Rubber Ducky scripts (all commands are supported)
- Scripts can be loaded to the ESP8266 flash memory or to the SD card and selected for deployment without the need to recompile/reflash the microcontrollers
- There is no limit to the payload size (limited only by the size of the SD card)
- It supports different keyboard languages
- Script execution and Live Command execution can be done remotely via WiFi
- Files can be exchanged between the target and the device via serial port, mass storage, or WiFi (http or ftp)(allowing data exfiltration and downloading of executables without access to internet).
 Scripts and files can be uploaded to the ESP8266 flash memory or to the SD card via WiFi
- Multiple scripts can be set for execution
- Scripts can call other scripts, allowing modular execution
- Status feedback / data can be received using CapsLock, NumLock & ScrollLock LEDs (or through serial port)
- Conditional execution based on feedback
- Scheduling the execution of scripts at a specific time
- Keyboard works with BIOS
In Progress
 Mass Storage Device Emulation
- Wifi Client
- File Storage
- Email Client
- Send Snapshots over wifi
- VCN server
- No need for flasher, ATmega32u4 firmware forwards data to the ESP after parsing for dedicated commands
- Script Encryption
- VID & PID can be customised (to prevent blacklisting Arduinos)
- Cactus WHID functionality, DNS fake servers, FTP, etc.
Protection Against SuperDucky
Protect access to BIOS with password Don’t grant Admin Rights to the user Monitor keyboard writing speed Capture Focus TODO check on internet
TODO
- Optimise minify to remove comments
- Incorporate best features of ESPloitV2 firmware